Order
Form

Building an MDF Rose Engine Lathe 2.0

Click on any of the images below which resemble a book to get to the respective book.

This page is designed to outline what you need to buy or build to make an MDF Rose Engine Lathe 2.0. The parts you need are:

  1. Lathe base and headstock
    1. The MDF parts for a base and headstock
    2. The spindle and other (non-MDF) parts needed for enabling headstock movement
  2. Some way to rotate the spindle
  3. A way to hold the object being made (e.g., a self-centering, 4-jaw lathe chuck)
  4. Tooling to cut the object
  5. A way to hold the tooling

Each of these is discussed more below.


1. Lathe Base and Headstock

Base and Headstock Purchase This Make it Yourself

Case Kit Assembled

MDF (medium density fiberboard) is used to make the lathe's body, both the base and the headstock.

The Case Kit we supply has all the MDF parts already cut to size and ready for assembly. It ships in a box ready to go, much like furniture from Ikea.

Many choose to build their own base and headstock, and it is not hard. We supply the instructions for the "do it yourselfer". These are in the brown book below.


This book is the manual for the cutting and assembling the MDF parts. Click on the image to open the book


Base Kit Added to the Assembled Case Kit

As you are assembling the base and headstock, you will also need to add some non-MDF parts.

Even if you build your own machine, you should get this kit of parts from us: It includes parts which are hard to machine as high quality parts. We worked with machinists to get a great kit put together.

The Base System Kit we supply provides these key parts needed to build the lathe base and headstock. These include:

  1. Spindle & spindle bushings
  2. Headstock pivot points
  3. Spindle flange to hold the rosettes
  4. 2 rosettes
  5. Rubber to push against the rosette
  6. Headstock bungee to keep tension between the rubber and the rosette

If you have access to a machine shop, you can certainly make your own parts. The drawings are in the book below.


This book is the manual which provides the drawings of all the machined parts for the base and headstock. Click on the image to open the book


2. Spindle Drive

This video overviews the two controls kit options
and attempts to outline the differences

The original MDF Rose Engine Lathe was designed to be hand cranked, but many added motor drives of various types to rotate the spindle. (Jon Magill later outlined a way to add a stepper motor for driving the spindle.)

The MDF Rose Engine Lathe 2.0 was designed from the get-go to use a stepper motor for driving the spindle.

The stepper motor used also has great torque, even at low speeds, so you can learn to use the rose engine lathe without having to be too cautious.

The system controlled by a Teensy is quite complex, and a new person is recommended to not go here just yet. It adds a lot of complexity that is best dealt with once you get the basics under your belt.

The video to the right overviews the differences between these two.

Spindle Drive Purchase This Make it Yourself

Pololu Tic controller for the spindle stepper motor

If you are getting started, the best way to control the spindle's stepper motor is to use a Pololu Tic.

This little board (1.5" x 1.05" x 0.47") does a great job of providing a consistent speed for the spindle, enabling some great work. It provides a way to drive the spindle at a variable speed: 0.01 to 6.7 rpm. It is also a very cost effective option.


This kit is a great option for retrofitting an original MDF Rose Engine Lathe to use a stepper motor for driving the spindle.

The Spindle-Only Stepper Motor Control Kit we supply provides:

  1. a stepper motor
  2. stepper motor mounting bracket
  3. both pulleys
  4. drive belt
  5. all the electronics

If you would rather build it yourself, you can follow the directions in the blue book below. There are a few parts you will need to fabricate, and those are in the book noted above which shows drawings for the machined parts.


This book is the manual for building a spindle drive based on a Pololu-Tic. Click on the image to open the book


Teensy 3.5 microcontroller

The Pololu Tic is a great way to start, but if you want to enable significantly more capabilities, we have a second option based on the Teensy 3.5 microcontroller.

The controller based on a Teensy allows for synchronizing the motion of up to 5 stepper motors. This may seem excessive, but consider this very typical scenario were we use stepper motors for:

  1. Spindle drive
  2. Separate drive for the rosette (i.e., for a Rosette Phaser / Multiplier)
  3. Drive for a Curvilinear Slide

Some user functions enabled with this system include:

  • Indexing (to tenths of degrees or portions of a circle)
  • Thread cutting (with infinite thread options)
  • Reciprocation
  • Simulation of a geometric slide for rose functions
  • Rosette phasing and multiplication

This kit is also a great option for retrofitting an original MDF Rose Engine Lathe to use a stepper motor for driving the spindle.

The Multiple Stepper Motor Control Kit we supply provides:

  1. a stepper motor
  2. stepper motor mounting bracket
  3. both pulleys
  4. drive belt
  5. all the electronics
  6. the necessary 3D-printed parts
  7. boxes to house the various pieces

We also offer an upgrade option, enabling you to move from the Pololu Tic system to this one.

If you would rather build it yourself, you can follow the directions in the brown books below. There are a few parts you will need to fabricate, and those are in the book noted above which shows drawings for the machined parts.

There are also some parts which need to be 3D printed, and the black book below outlines those and provides the files needed.


These are the manuals for building the control system which can drive multiple stepper motors simultaneously. Click on the respective part of the image to open that book


3. Work Holding

Spindle with Adapter and Draw Bar
(spindle shown split in half)

The spindle we supply has a #2 Morse Taper in the nose, and no threads. Thusly, we include with that spindle:

  1. an adapter to hold a chuck threaded for a 1"-8 spindle nose, and
  2. a 3/8"-16 draw bar to keep that adapter firmly attached.

This allows you to use typical work holding devices such as a 4-way chuck or a collet chuck.


As the spindle used has a #2 Morse taper, any adapter from #2 MT to other thread sizes can be used. We have found that the ones made by Best Wood Tools are quite good.

Key Note: You do need to use an adapter which accommodates the use of a draw bar. The ones sold for reversing a chuck onto the tailstock of a wood lathe typically do not have such capabilities.


4. Tooling to Cut Designs

Once you get the machine built and a way to rotate the spindle, the next consideration is how you want to cut patterns into the object you are making. The traditional method is to use a cutting frame or a drill spindle.

If you are just starting though, and especially if you are not sure you want dive head-long into this, you can use something you have on hand to get started. One commonly-seen example is to use a Dremel-style device, or even a flex tool like the Foredom. The results won't be as great, but it is a way to get started. Some have also used a router.

Overhead Drive Purchase This Make it Yourself

The more traditional cutting tools are available two ways:

There are a myriad of reasons why an overhead drive is preferred by many:

  1. As you add more cutting frames or drilling spindles, only one motor is needed for all of them, saving you money.
  2. By having the motor separated from the cutting frame or drilling spindle, there is a reduction in transfer of the motor's vibrations to the cutter.
  3. By having the motor further away from you, the motor's noise is further from you.
  4. By having the motor further away from you, there is less obstruction to the visibility of the work.

An overhead drive is only needed if you use a cutter which does not have an integrated motor.

We supply an Overhead Drive Kit which fits nicely onto the MDF Rose Engine Lathe 2.0.


You will need to also order the Variable Speed Midi Lathe Conversion Kit, p/n TCLVSKIT2 from Penn State Industries. This is the motor used on the Overhead Drive Kit.

You can easily build your own following the article by Jon Magill (Build an Overhead Drive). My 1st one followed Jon's directions. I made the arms out of 2x2s and I used an 1/4 hp A/C motor from an old midi-lathe. It was nothing to look at, but it worked wonderfully for years.


The Variable Speed Midi Lathe Conversion Kit, p/n TCLVSKIT2 from Penn State Industries is a very nice option for a variable speed motor for the overhead drive.

Cutting Frame Purchase This Make it Yourself

DIY Cutting Frame for an Overhead Drive
Image courtesy Bill Ooms

My cutting frames are the most used cutters in my toolbox. I recommend you start with one of these.

We provide a Universal Cutting Frame made by Brad Davis. This one uses triangular carbide cutters.

This uses an overhead drive to power it.


Alternatively, you can certainly choose to start with a cutting frame which uses an integrated drive motor: many do. If you want to go that way, we don't make them, but Wade Wendorf at Mandala Rose Works sells a nicely designed universal cutting frame. This is a bit easier than using one driven by an overhead drive, but it is also noisier.

You can make one yourself. Bill Ooms published plans for making a cutting frame.

I followed Bill's instructions to make my 1st cutting frame, and it worked well. I used it for years.

Bill also published plans for making a MicroMotor-based Universal Cutting Frames.

Drill Spindle Purchase This Make it Yourself

Drilling Spindle with an Integrated Drive Motor
Image courtesy Mandala Rose Works

A drill spindle is also a great tool in the toolbox.

We provide a Drill Spindle which we get made.

This uses an overhead drive to power it.


Alternatively, you can certainly choose to start with a drilling spindle which uses an integrated drive motor. If you want to go that way, we don't make them, but Wade Wendorf at Mandala Rose Works sells a nicely designed drill spindle. This is a bit easier than using one driven by an overhead drive, but it is also noisier.

You can make one yourself. Bill Ooms published plans for making drill spindle.

I followed Bill's instructions to make my 1st drilling spindle. It worked well, and I occassionally use it.


5. Tool Holding

Regardless of the tooling you use to cut the design, the cutting tool needs to be held in a manner which allows it to move smoothly along the lathe's X and Z axes.

Tool Holding Purchase This Make it Yourself

There are a number of options you can pursue for this. Some have started by using an X-Y table designed for use on a drill press (like this drill press cross vice from Grizzly). This works to get started, but you'll want to move to a more traditional X-Y table.

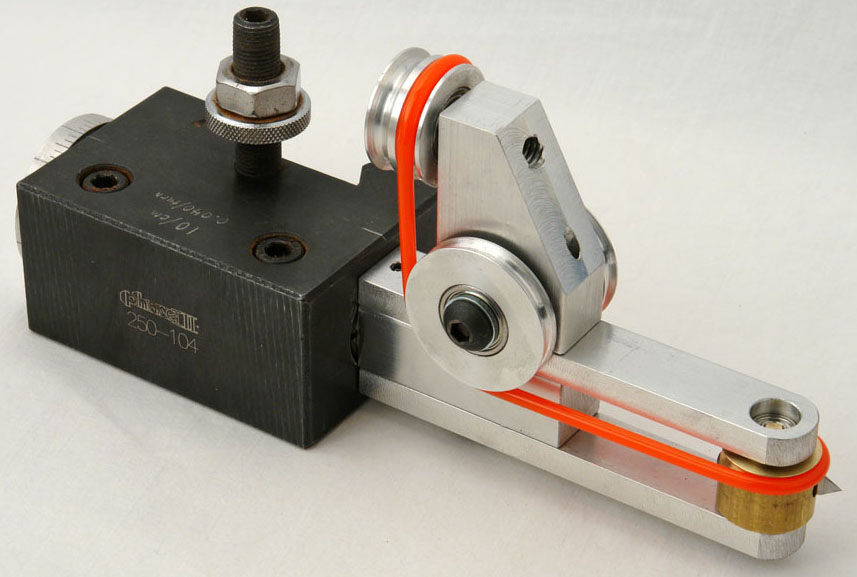
A quick change tool post (QCTP) attached to a cross slide makes it very easy to swap out tooling, but more importantly, it makes it easier to set the vertical height for the cutter (the Y axis).

We recommend using these 3 items (all are needed) from LittleMachineShop.com:

  • X-Y Table, p/n 2008
  • Quick Change Tool Post, p/n 4701
  • Tool Holder, p/n 2281

The Case Kit which we supply includes the additional MDF pieces needed to raise the X-Y table's level to what is needed to get the cutting tool to the right height, and the MagSwitches. Alternatively, you can build your own using the DIY directions for that kit.

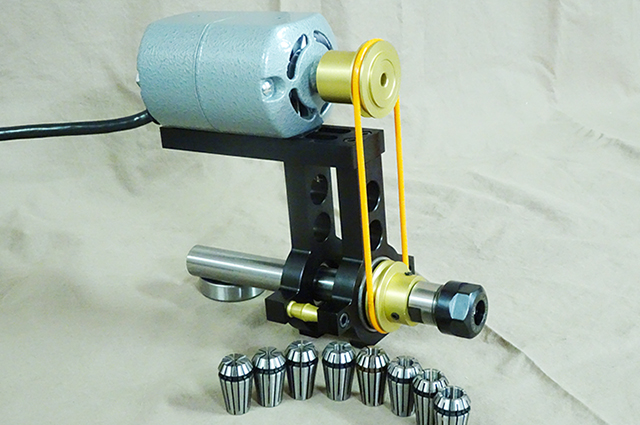
This is not recommended when you use a cutting frame or drill spindle.

However, if you use some other cutter (e.g., a Dremel-style device, or even a flex tool like the Foredom), you will need to fabricate some way to hold the cutter in the tool holder.


Still have questions?

If you still have questions or it just doesn't make sense, don't fret. Rose engine lathes take a while to wrap your mind around, but are great fun once you do. In the interim, please send me an eMail at ColvinTools@Gmail.com. I'll be happy to schedule time to chat or schedule a video chat so we can help answer all your questions.